就在刚刚,我上传了 dynamic-data-source-spring-boot-starter 0.0.1 版到 maven 中央仓库,之前只在私服传过 Android 的 aar 包,今天还真是第一次上传 jar 包到 maven 中央仓库,听起来感觉有点不可思议,毕竟数年的工程师了…
由于我是在凌晨时分创建账号与仓库等,所以中间并没有等多久,大概创建仓库后,10分钟内就收到了要我添加 dns 记录的回复,添加后我又添加了备注,即更新了那条创建仓库的 issue,之后告诉我通过了,接着我就上传了,整个过程大概在 30 分钟左右。以下是具体过程,仅供参考。
1、注册账号,地址是:https://issues.sonatype.org/secure/Dashboard.jspa 该界面可以登录也可以创建账号,之后记住用户名和密码,上传时需要用到。
2、登录后点击新建,项目这里选择 Community Support - Open Source Project Repository Hosting (OSSRH) 问题类型选择 New project,然后根据页面提示输入即可。至此结束了。
3、添加 txt 记录,你可能会收到类似这样的回复:
Do you own the domain kpromise.top? If so, please verify ownership via one of the following methods:
- Add a TXT record to your DNS referencing this JIRA ticket: OSSRH-53312 (Fastest)
- Setup a redirect to your Github page (if it does not already exist)
此时,需要做的就是对 kpromise.top 这个域名新增一条 txt 记录,子域名为 OSSRH-53312 值为 OSSRH-53312 的链接,即 https://issues.sonatype.org/browse/OSSRH-53312 ,添加后,打开你创建的项目,并添加备注,大概意思就是 你已经添加了记录,比如我就是这样写的:
I own the domain kpromise.top and I have added a txt record with subdomain ossrh-53312.kpromise.top and referenced to https://issues.sonatype.org/browse/OSSRH-53312
4、在 ~/.m2 目录下面找到或新建 settings.xml 也可以在 IDEA 里找到 pom.xml 文件,然后鼠标右键点击它,在弹出的菜单里,拉到最后选择 maven,之后选择 打开 或者 新建 setting.xml 文件,然后在 settings 节点下加入这么几行:
<servers>
    <server>
        <id>ossrh</id>
        <username>你的用户名</username>
        <password>你的密码</password>
    </server>
</servers>
5、生成 gpg 密钥对,我是 Manjaro 系统,gpg 似乎自带,反正已经有这个命令,也可能是我之前安装的,Windows 和 其他 linux 用户 自行解决哈。官网是 https://www.gnupg.org/download/,生成秘钥对的命令是 gpg --gen-key 会问你姓名和邮件,最后会让你设置密码,这个密码也要牢记,上传时会用到。
6、通过 gpg --list-keys 查看你的秘钥,输出大致如下:
pub   rsa2048 2019-11-23 [SC] [有效至:2021-11-22]
      0E13xxxxxxxxxxxxxxxxxxxxxxxxxxxxxxxxxxxxxx
uid           [ 绝对 ] xxxx <xxx@xxx.xxx>
sub   rsa2048 2019-11-23 [E] [有效至:2021-11-22]
其中,第二行 是你的秘钥 id,你需要通过 gpg --keyserver keyserver.ubuntu.com --send-keys 0E13xxxx 将你的秘钥对上传到秘钥服务器,将这里的 0E13xxxx 换为你自己的秘钥 id 即可,然后通过 gpg --keyserver hkp://keyserver.ubuntu.com --recv-keys 0E13xxxx 来校验是否上传成功,同样的,将0E13xxxx 换为你自己的秘钥id,如果输出 未改变 就是上传成功了。
7、修改你的 pom.xml 文件,保证有以下内容:
<groupId>top.kpromise</groupId>
<artifactId>dynamic-data-source-spring-boot-starter</artifactId>
<version>0.0.1</version>
<packaging>jar</packaging>
<description>Spring Boot with dynamic data source support.</description>
<name>dynamic-data-source</name>
<url>https://www.kpromise.top</url>

<developers>
    <developer>
        <name>kpromise</name>
        <url>https://www.kpromise.top</url>
        <email>ijustyce@163.com</email>
    </developer>
</developers>

<scm>
    <url>https://github.com/ijustyce/dynamic-data-source-spring-boot-starter.git</url>
    <connection>scm:git:https://github.com/ijustyce/dynamic-data-source-spring-boot-starter.git</connection>
</scm>

<licenses>
    <license>
        <name>MIT License</name>
        <url>http://www.opensource.org/licenses/mit-license.php</url>
        <distribution>repo</distribution>
    </license>
</licenses>
将我的名字 改为 你自己的名字,url、email 也是,scm 这里也改下,licenses 看情况修改即可。
8、在 pom 文件里再加入如下内容:
<build>
    <plugins>
        <plugin>
            <groupId>org.apache.maven.plugins</groupId>
            <artifactId>maven-compiler-plugin</artifactId>
        </plugin>
        <plugin>
            <groupId>org.apache.maven.plugins</groupId>
            <artifactId>maven-surefire-plugin</artifactId>
        </plugin>
        <plugin>
            <groupId>org.apache.maven.plugins</groupId>
            <artifactId>maven-source-plugin</artifactId>
            <executions>
                <execution>
                    <id>attach-sources</id>
                    <goals>
                        <goal>jar</goal>
                    </goals>
                </execution>
            </executions>
        </plugin>
        <plugin>
            <groupId>org.apache.maven.plugins</groupId>
            <artifactId>maven-javadoc-plugin</artifactId>
            <executions>
                <execution>
                    <id>attach-javadoc</id>
                    <goals>
                        <goal>jar</goal>
                    </goals>
                </execution>
            </executions>
            <configuration>
                <charset>UTF-8</charset>
                <encoding>UTF-8</encoding>
                <docencoding>UTF-8</docencoding>
            </configuration>
        </plugin>
        <plugin>
            <groupId>org.apache.maven.plugins</groupId>
            <artifactId>maven-gpg-plugin</artifactId>
            <version>1.6</version>
            <executions>
                <execution>
                    <id>sign-artifacts</id>
                    <phase>verify</phase>
                    <goals>
                        <goal>sign</goal>
                    </goals>
                </execution>
            </executions>
        </plugin>
        <plugin>
            <groupId>org.sonatype.plugins</groupId>
            <artifactId>nexus-staging-maven-plugin</artifactId>
            <version>1.6.8</version>
            <extensions>true</extensions>
            <configuration>
                <serverId>ossrh</serverId>
                <nexusUrl>https://oss.sonatype.org/</nexusUrl>
                <autoReleaseAfterClose>true</autoReleaseAfterClose>
                <skipNexusStagingDeployMojo>false</skipNexusStagingDeployMojo>
            </configuration>
        </plugin>
    </plugins>
</build>
<distributionManagement>
    <snapshotRepository>
        <id>ossrh</id>
        <url>https://oss.sonatype.org/content/repositories/snapshots/</url>
    </snapshotRepository>
    <repository>
        <id>ossrh</id>
        <url>https://oss.sonatype.org/service/local/staging/deploy/maven2/</url>
    </repository>
</distributionManagement>
行了,配置完毕,不过你也可以再核实下 distributionManagement 里配置的 url,这个 url 应该不会变,但具体以你项目下 官方人员回复的 链接为准。其他的就不用改了,因为都是标准的配置,除了 maven-gpg-plugin 还有个版本号之外,其余的版本号都不需要写,所以如果你一定要改,那么改 maven-gpg-plugin 的版本号为最新即可,目前最新的是1.6,且还是15年发布的,所以感觉以后更新的可能性也不大,另外可以更新下 nexus-staging-maven-plugin 的版本号,目前最新是 1.6.8,同样,是17年发布的,感觉以后更新的可能性也小很多,没有 nexus-staging-maven-plugin 这个插件,你执行完第 9 步后需要 打开 https://oss.sonatype.org 并登录,然后 点击 Staging Repositories -> 在搜索栏输入你的 groupId -> 勾选你的构件并点击 close -> 点击 tab 栏的 release,即需要手动 close + release,之后再打开你当初创建的 issue,然后备注你已经发布了。之后你会收到这么一条提示:
Central sync is activated for top.kpromise. After you successfully release, your component will be published to Central, typically within 10 minutes, though updates to search.maven.org can take up to two hours.
即已经成功发布了,10 分钟内发布到 Central 两小时内 可以在 search.maven.org 搜索。
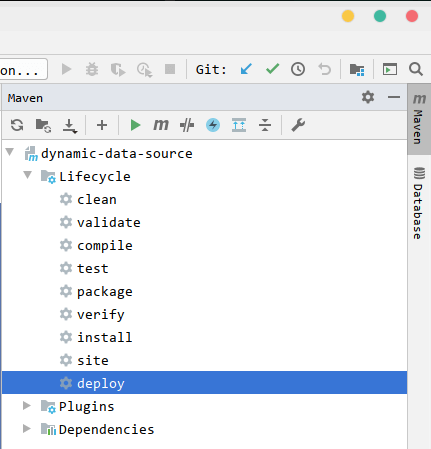
9、在 IDEA 里 打开 maven 视图,即右侧靠近搜索按钮的地方,具体如下图:

在 Lifecycle 下面,先双击 clean 然后双击 deploy,记得,是 Lifecycle 下面哦,可不是 Plugins 下面,然后会要你输入密码,这个密码是创建 gpg 秘钥时你填的。上传完毕后,再打开你之前创建的 issue 添加备注,大概意思就是说你已经上传了你的第一个 release。
2019-11-24 补充:关于发布 release 和 SNAPSHOT,只需要将你的版本号改下即可,如果版本号包含-SNAPSHOT,比如 0.0.2-SNAPSHOT 则会发布到 SNAPSHOT,不包含则发布 release,如下配置是发布到 SNAPSHOT
<groupId>top.kpromise</groupId>
<artifactId>dynamic-data-source-spring-boot-starter</artifactId>
<version>0.0.2-SNAPSHOT</version>
<packaging>jar</packaging>
<description>Spring Boot with dynamic data source support.</description>
<name>dynamic-data-source</name>
<url>https://www.kpromise.top</url>
如果将这里的 0.0.2-SNAPSHOT 改为 0.0.2 然后发布,则是发布到 release